


If you are following us lately you might have read our article on some tips & tricks for Wi-Fi routers, and if you haven’t, do check it out here. Since this article, we have been getting many requests for a complete guide on Port Forwarding. And as you all wished, we are here to serve you with some feast of Port Forwarding.
The word in itself sounds complicated and gives us a feeling of it being a lengthy process. Ummmm, it is a bit lengthy and complicated (not gonna lie). But of course, you should not worry about it because we are here to make it simpler for you (I mean this is what our job is )
As a brief introduction, Port Forwarding simply is a feature that lets you access your PC files from anywhere around the world on your other device be it desktop or a mobile phone. Nowadays, it is also useful for people who are looking for prospects in gaming as a career You’ll have the control to share either a particular section or folder of your PC or give complete access to it.
I bet reading only this much has made you excited already. So now, let’s not waste any time and let’s GET STARTED…..
Table of Contents
How Port Forwarding works in theory??
Let us start with some theoretical knowledge about the topic. It is boring, but more than necessary to understand how the process works. Also do remember, you are reading @ www.sarcasticsindhi.com, and we come with a guarantee that we won’t make you feel bored while reading
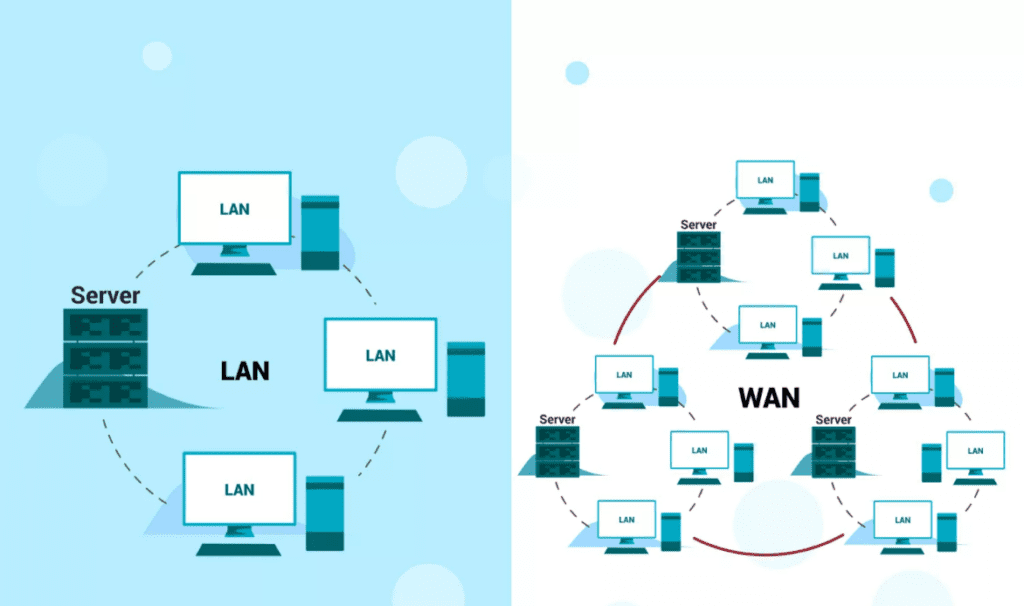
There are two types of networks we generally use in our daily lives, namely WAN (Wide Area Network) & LAN (Local Area Network). WAN is the outer world of networks and LAN is a local network usually formed in your house which has all devices connected to your Wi-Fi router. Your Wi-Fi router is both a bridge between WAN & LAN and it also connects devices on your LAN. For example, when you use Wi-Fi on your mobile phone, you are connected to LAN, and when you are using mobile data, you are connected to WAN.
What happens in this process is that when you request to access the folders of the PC, the router must be knowing that to which device it has to approach with the request and what folders are to be shown.
And for all this, firstly we have to make an FTP server and then command the router of how it has to function.
Different ports have different usages for different scenarios, and here we are going to use FTP for Command Control which has a Port Number of ‘21’.
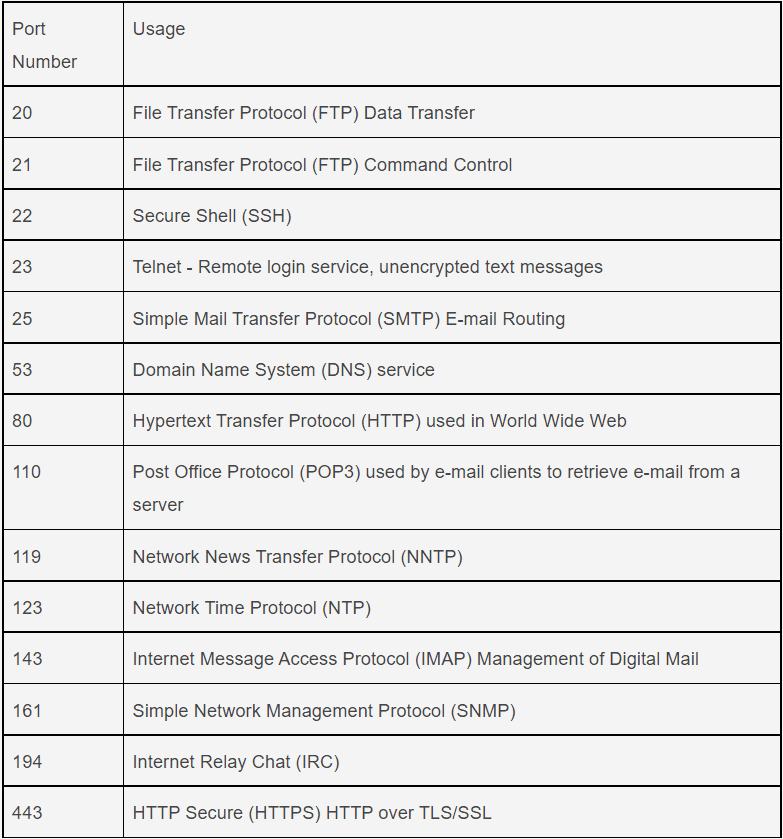
This port number allocation is done so that the router can identify to which requests it has to respond and bridge the connection for the PC and user.
Do I need Static IP?
A clear cut answer to this question is “YES”. You do need a static IP to do all this process. Many Internet Service Provider (ISPs) provide an on-demand static IP for free, but some may charge. It all depends on your ISP. Hope ki aapko free mein mil jaaye ????.
But why Static IP?
The answer to this question is very logical. The IP of your router has to remain the same forever so that you can access it every time without hassle. In Dynamic IP, the IP reset is very short intervals of time which does not help us in the process. Similar to your residential address, any visitor must know your address and you must not change your address very frequently.
Let’s begin the actual step-by-step guide cum tutorial for activating the Port Forwarding feature….
Step – 1:- Enabling the FTP Server
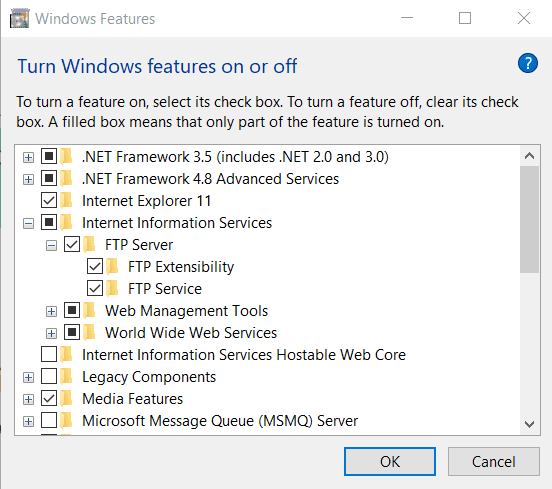
- Search Windows Features on Start Menu and then open ‘Turn Windows features on or off’
- Find ‘Internet Information Services’
- Enable it expand the option by clicking on ‘+’ on the left side
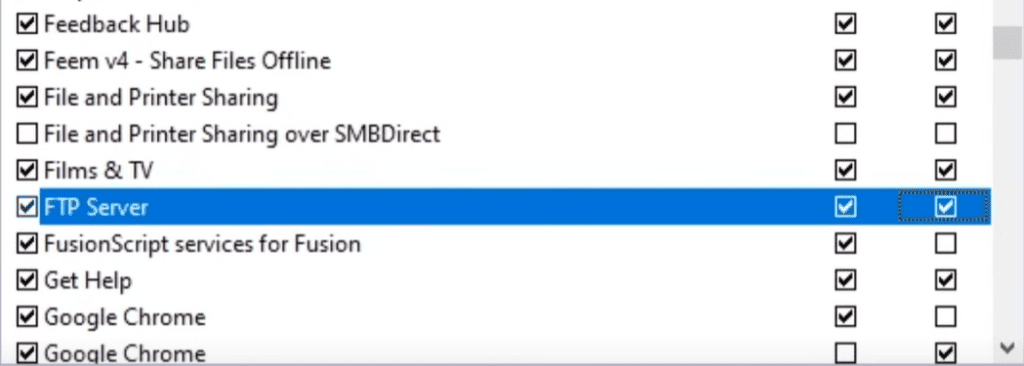
- Enable all the three options namely ‘FTP Server’, ‘Web Management Tools’ & ‘World Wide Web Services’
- Now expand the ‘FTP Server’ option by clicking on ‘+’ on the left side
- Make sure that both ‘FTP Extensibility’ & ‘FTP Service’ options are enabled
- Then click on OK and the system will apply the changes. The system might also ask you to restart the system, in which case you can restart without any worry
Step – 2:- Setting Up Internet Information Services
- Search IIS on Start Menu and then open ‘Internet Information Services (IIS) Manager’
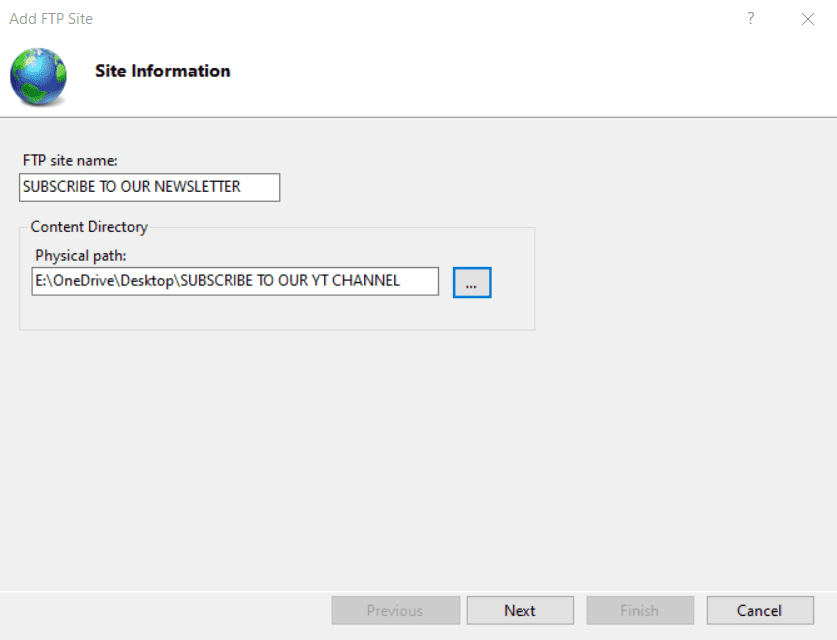
- Right-click on the left side blank area in the window and select ‘Add FTP Site…’ . Now a pop-up window will open
- Give a custom name to the FTP site and select the folder or path of the section of which you want to share on the server
- Click Next
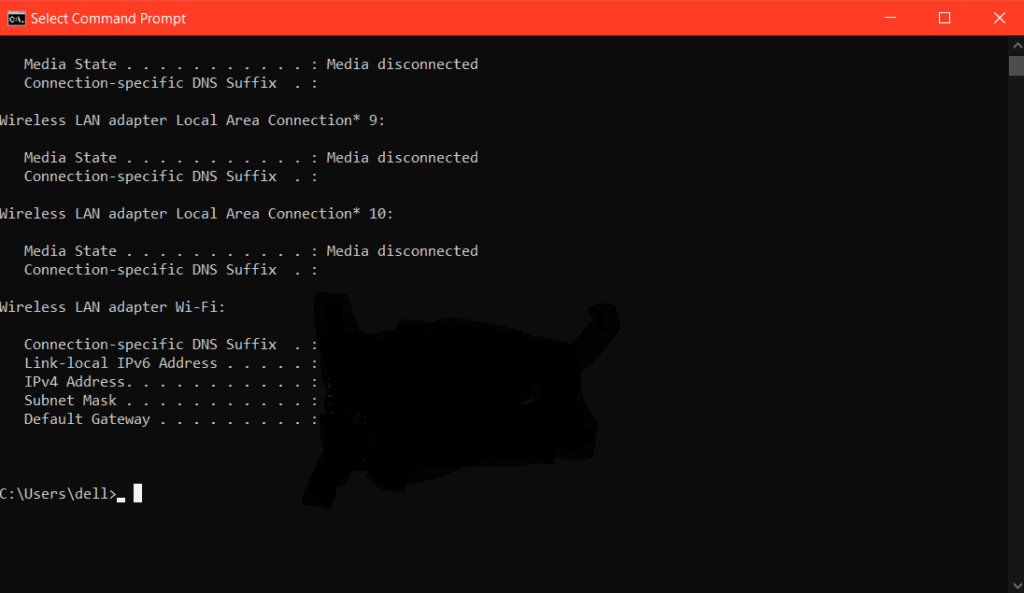
- Now select the IP of your device on the network. If you don’t know it, search it on the Command Prompt [Ignore next three points if you know your IP]
- Search cmd on Start Menu and select ‘Command Prompt’
- Type ‘ipconfig’ after opening Command Prompt and press enter
- Search for your IP address on the current connection
- Back to the IIS pop-up, select SSL requirement. Using SSL is highly recommended if the data you are sharing is highly confidential
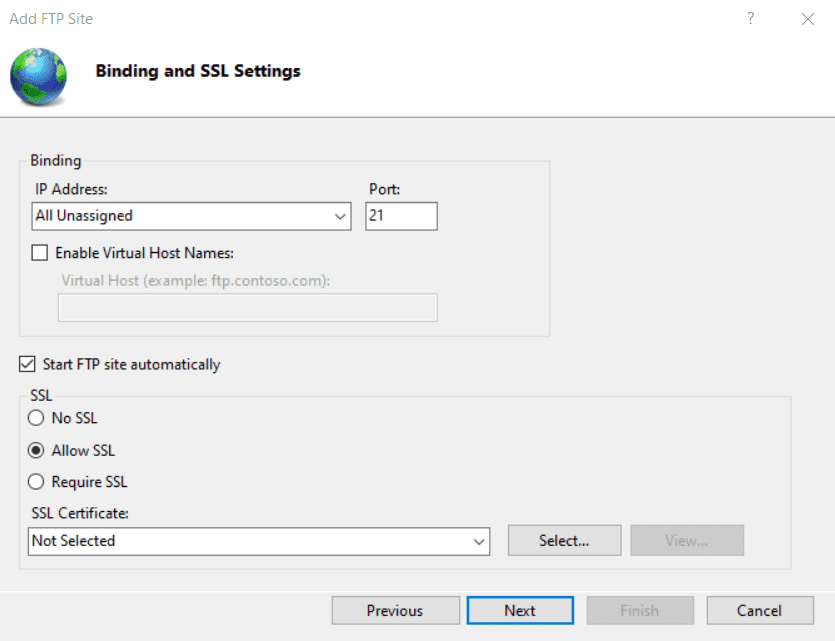
- Then click on Next
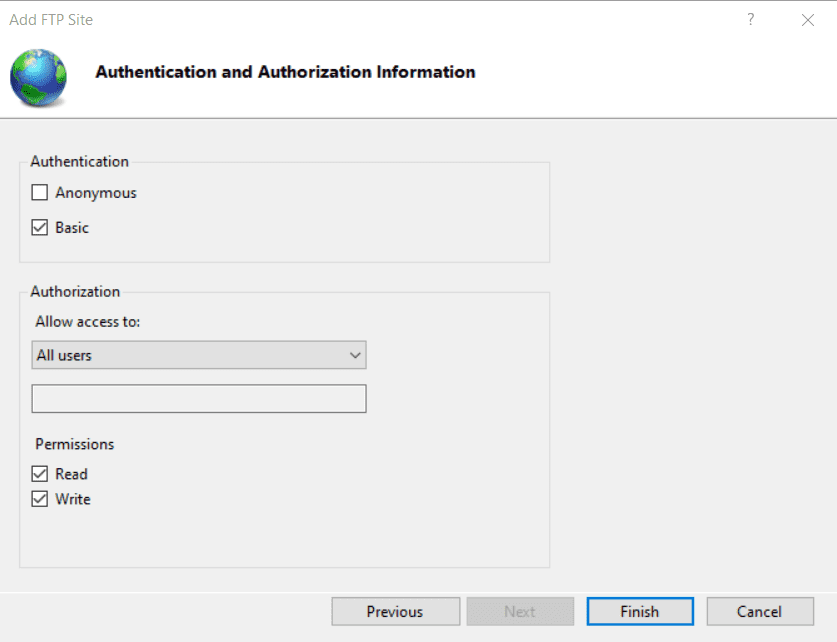
- Now select the security settings according to your requirements and then click on Finish
Step – 3:- Bypassing the Firewall
This step is done to instruct the firewall not to block someone trying to access our FTP Server
- Search Network Protection in Start Menu and select ‘Firewall & network protection’
- Then select ‘Allow an app through firewall’. A pop-up window will open
- Click on ‘Change settings’
- Search for ‘FTP Server’ and make sure all the three boxes of ‘FTP Server’ are checked
Now your FTP Server can even bypass the Firewall
Step – 4:- Commanding the Router
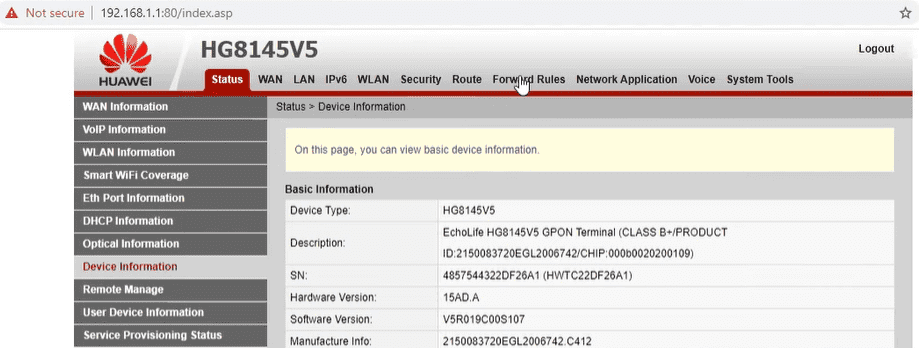
- Open the configuration page of your router on the browser
- Search for Port Mapping or Port Forwarding options (location on the portal will differ for every ISP)

- Now click on ‘New’
- Then fill in the details as shown in the image
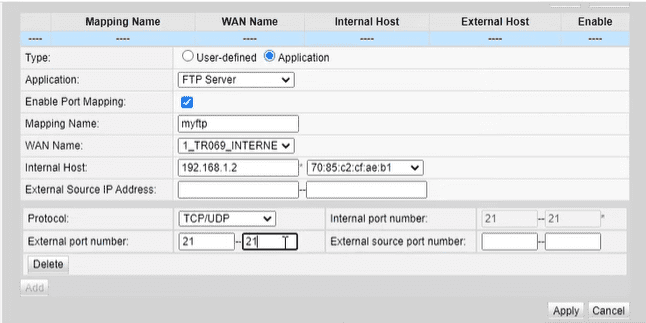
- You can choose Mapping Name as what you want, and in the row of ‘Internal Host’, in the first blank you have to put the IP of your device which we earlier noted
- In the second blank fill the MAC Address [If you know MAC Address already then ignore the next three steps]
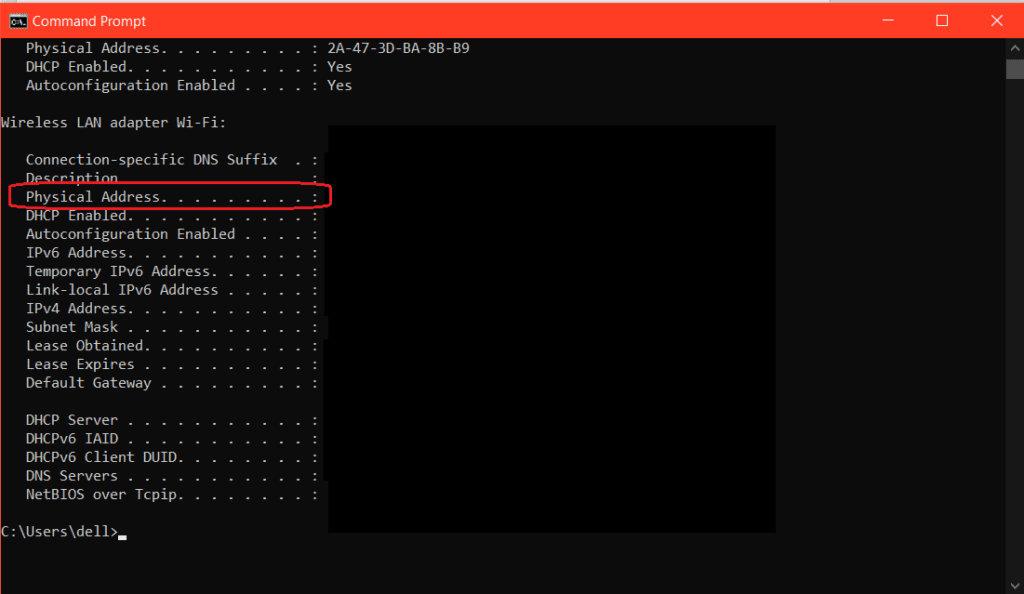
- Search cmd in Start Menu and open ‘Command Prompt’
- Type ‘ipconfig/all’ after opening Command Prompt and press enter
- Search for your MAC address on the current connection [Your MAC Address will be shown by the name of ‘Physical Address’ as shown in the below image]
- After filling in all the details, click ‘Apply’
Step – 5:- Instructing Router about the Static IP
Through this step, we will inform the router about the static IP.
- Search for DHCP Static IP Configuration on your ISP’s configuration portal
- Now write the MAC Address & IP Address of your device and in the blanks
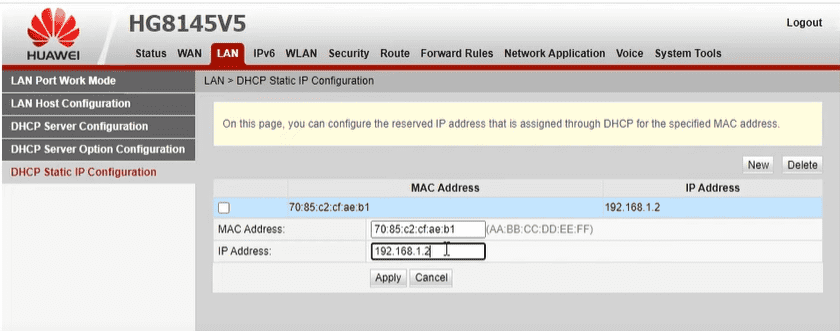
- Now click on ‘Apply’
Step – 6:- Adding Users
- Search add users on Start Menu and open ‘Add, edit, or remove other users’
- Now you can add anyone by clicking on ‘Add a family member’
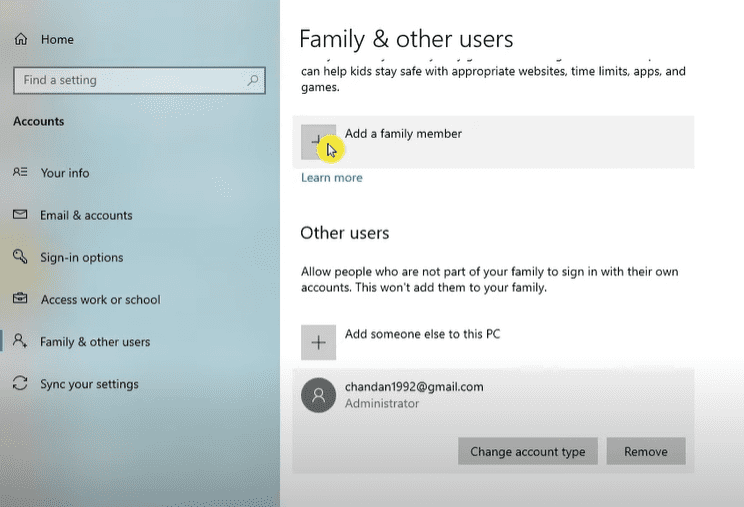
- The user you are going to add must have a Microsoft Account
And we are done…. Cheers!!!
Now that we have created the FTP Server, it is now time to access it
Accessing the Server via Windows PC
It is time to check if we successfully created the server or not.
To do so follow the below-mentioned steps:-
- Go to any folder and then go to the Explorer bar on the top and type “ftp://your static ip:21”
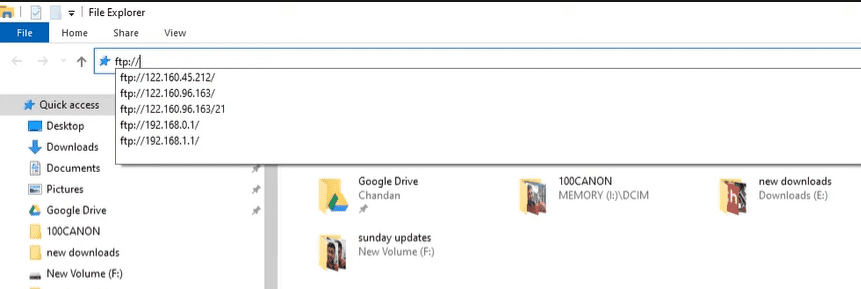
- Press enter
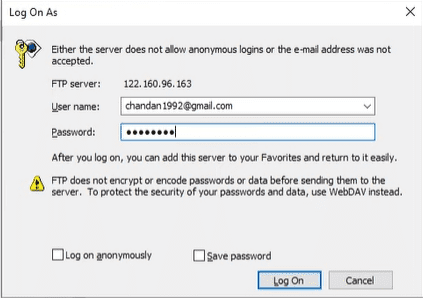
- Now a pop-up window will appear, where you have to enter the username and password of the account you just added
And BOOM, you are ready to go
But wait a minute…..

How can you access all of this on your mobile phone??
Let’s see
As always follow the below-mentioned steps:-
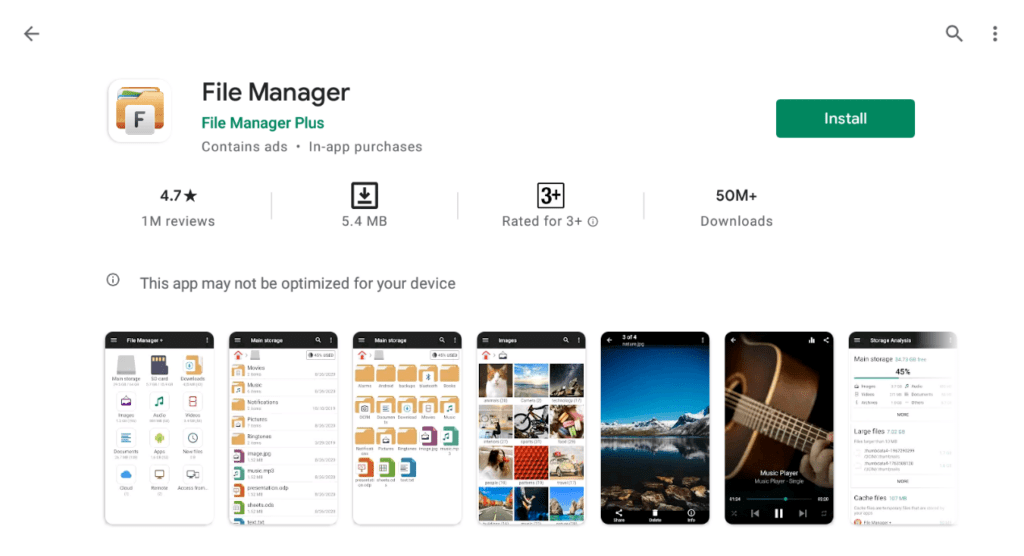
- Install ‘File Manager’ from ‘File Manager Plus’ on your mobile
- Open the app
- Select the ‘Remote’ option
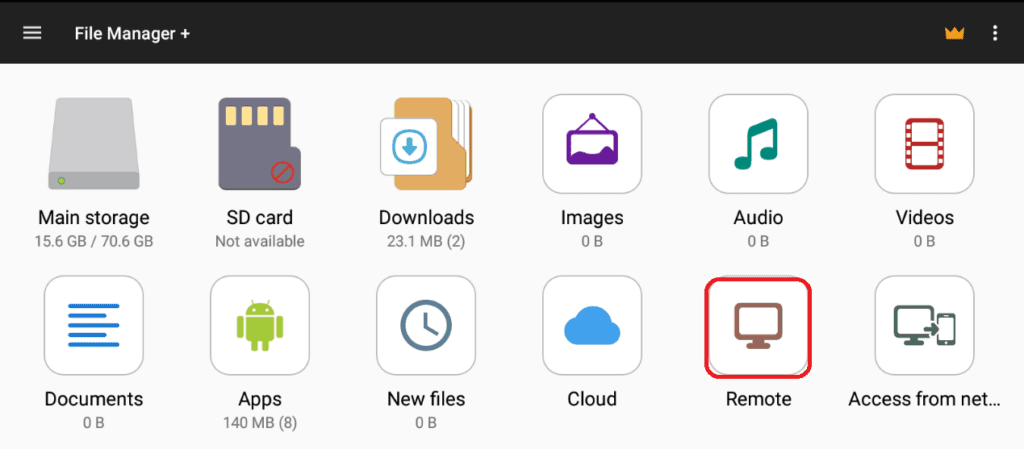
- Now select ‘Add a remote location’
- Then click on ‘FTP’
- Now fill in all the details asked and at last, press OK
And there you go…
Enjoy!!!
For more such content, subscribe to our YouTube Channel and also our newsletter
Till then Stay Safe , Stay Sarcastic !

GIPHY App Key not set. Please check settings